
If you are reading this, then you may be considering getting a bench vise. The bench vise is an essential piece in every man/woman’s workshop. They can be used to clamp things or hold stuff down in the workshop. The device has a simple mode of operation, as simple as turning the handle will help the vice close when it’s open. I guess that’s not too hard!
The vise is a standard accessory in most workshops. However, vise owners would question how possible it is to accomplish any task in the studio without using a clamp. It’s one of the essential tools that is commonly used by most handymen and workshop owners.
You are going to find the best bench vise out there and use it. Whether you’re working on wood or metal, the place of a clamp cannot be replaced by any tool. And one of the best tools you can use to clamp is the bench vise. A great turn on the handle applies the right pressure.
For a seasoned professional in their workshop, using the vise remains a routine. However, for beginners who are having their first sight on a vise, it might require a bit of time to get used to the tool. In this article, we’re going to look at the various components of a bench vise and explain the functions of each component.
Different Parts of a Bench Vise and Their Functions
1. The Base
The base of the vise is the part that holds everything together. It is truly the life of the party. The base of the vise is fastened to the bench and it comes in different designs. Some can be clamped in place; the others can be bolted. There are also swivel and vacuum bases available for different purposes.
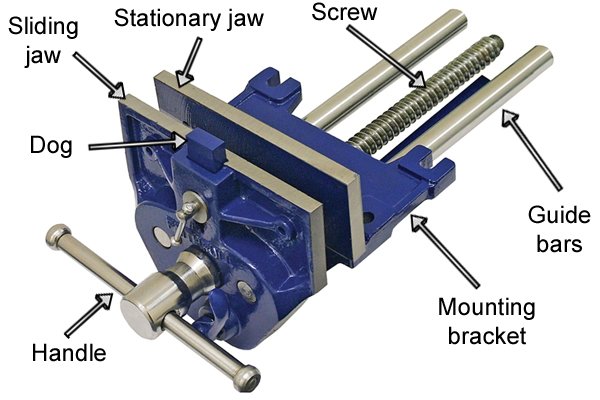
2. The Jaw
This is where everything stays. The jaw is jaw-like and clamps everything in place. It comes in two different parts. Considering the nature of the job, the jaws can take the form of wood, plastic, or metal.
The sliding jaw: this part of the jaw moves when the handle is turned. It also applies pressure on the object being clamped. If you are new to clamping, it’s pretty easy to spot out which part of the clamp is the sliding jaw, since it’s the part that allows motions and has a handle sticking through.
The static jaw: this part is fixed. This is the vise that enforces solidity. The sliding jaw backdrops in this component—applying pressure for its immovability. You can identify the static jaw by its size.
3. The Slide
This part moves when the handle is turned, applying pressure to the object. It is attached to the sliding jaw.
4. Main Screw
This is where the magic happens. The force applied to the handle is transformed into the movement of the sliding jaw, which moves towards the static jaw. This jaw is conspicuously attached to the handle—and extends through the vise. The main screw is an essential part. It is so vital that if the main screw is not manufactured based on the type or comes with flaws creating weaknesses, the vise will not hold well at all. You might be able to apply the pressure but don’t count on it being maintained.
5. Handle
The handle is the most sophisticated part of the vise. With the principle of leverage, you can easily convert a minimal force to something unstoppable. The handle has a lever attached to it. The operation of the handle is a perfect scene of how rotary motion is converted to linear. The sight is something that will blow the mind of anyone, especially those with less engineering skill.
Applying too much force on the handle can be tempting. But if done out of proportion, it can lead to explosive results. The power applied to move the handle multiplies and gets accompanied by the actions of the main screw. While clamping, if any material observes a bend, it’s best to stop and reverse the handle to release the pressure level.
6. The Anvil
This can come in handy form when light-shaping of materials. It can also be used as a base to your hammer nails, although this feature is only found in metal vises.
7. Serrated Jaws
No! Not the movie. This is the actual point where the vise meets with whatever it is you are fastening. Take precautions with anything other than metal. The jaws can do a ‘damage job’ when too much pressure is applied.
Try not to put too much pressure or you might end up making a mess of the object you fastened. Perhaps, if the object is not destroyed then it’s possible to end up with cracks and scratches. If you want to avoid this, we strongly recommend going for soft jaws or jaw caps. They’re built to reduce the risk of scratches and any possible damages.
8. Pipe Jaws
This is yet another rare feature in a bench vise. Although there are lots of metalwork vises designed with a pair of jaws, these pipe jaws can be found inside the sliding and static jaw. They allow you to hold pipes and other oddly shaped objects in place, and present you with the prerogative to cut them easily.
Conclusion
Contrary to most assumptions, bench vises are not one of those sophisticated tools. They are easy to install, simple to use, loudly powerful and versatile, giving you ease and comfort when it comes to accomplishing things we naturally can’t do with our bare hands.
If you don’t have a bench vise yet, then I guess you’re on your way to get one ready. You’ll be amazed at the difference this tool creates in your workshop. Whether it’s a wood, metal, motor, or a mechanic job, you will question how possible it’s to accomplish anything without it in your workshop.


