
If you are dealing with any kind of wood or related applications, especially for your latest DIY project, adding a nail gun in your toolkit is a must. A nailer is a special tool that facilitates driving nails into wooden or other materials. It arrived as a replacement for those noisy hammers and lessened the manual labor to put nails.
Once you get your nail gun, you need to know how to reload it. This is where you will find our guide quite beneficial. Read on to know how to load a nail gun in the safest and quickest way.
How to Load a Nail Gun? – 6 Steps
Step 1: Power off the gun before loading
First, make sure your nail gun has been plugged out from the power board. Don’t forget to plug it out before you start because there is a good chance of getting electrocuted at the time of loading nails. This is also necessary because you may accidentally release a nail while doing this and badly injure yourself.
Step 2: Understand your own model
Different nailer brands make different designs for their products, and of course, different models of the same brand may also differ in many ways. Over that, these power tools come in many variations. There is an instruction manual that came with your nail gun. Check that out to understand the characteristics of your specific model. You should pay attention to the information regarding –
- The location of the magazine
- The type of the nail strip
- The location of pusher and latch
Step 3: Get the perfect nail clip for your specific nailer
Your nailer may be suitable either for an angled strip or a straight strip or clip, depending on the connection of sleeve or magazine to the barrel inside the machine. Find out what’s your case from the manual.
Make sure all the nails in the clips are positioned correctly. Failure to do so may result in jamming of the nails inside the machine. You can ask for assistance from a storekeeper. It’s good to purchase the clip from an authorized shop of your brand to get better support.
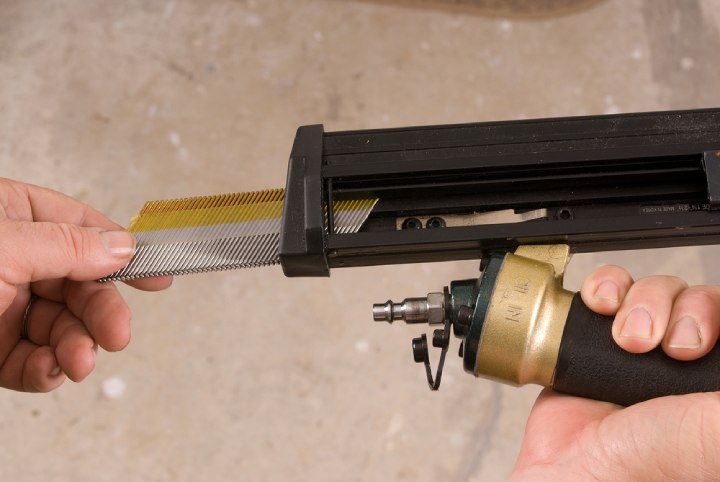
Step 4: Position your nail strip properly
You should place the nail clip in the same alignment with that of your nailer’s sleeve. Besides, you need to put the clip in such a way that the head of the nails faces towards the barrel. The clip also needs to be angled in the correct direction.
Step 5: Insert the nail strip into the notch
Check the base of the magazine and find out the notch there. After opening the pusher, line up the nail clip in it. But before that, you should remove any existing nail inside there. Also make sure that the accurate position of the nail clip is maintained at the time of your insertion.
You can simply invert your nail gun so the nail clips simply slide towards the end following the rule of gravity. After that, give a moderate push to insert the clip gradually until it makes a clicking sound. This sound will be generated by a spring mechanism and indicate that the strip has been perfectly set.
Step 6: Slide off the pusher to secure the clip inserted
Now slide off the pusher to its initial position so it rests against the last nail just after the perfect setup of the clip. Otherwise, the nail clip may slip out during the time of using the nail gun.
That’s it! You have successfully loaded your nail gun just like a pro.
Conclusion
Before we conclude, we would like to mention that we discussed the whole process from a general point of view. You may need to make adjustments according to the requirements of your nailer model.
We hope this blog will make the process of loading nails in your nailer a lot easier and effective. Don’t forget to take the essential safety measures before dealing with this type of tool since your safety is always your top priority.
FAQs
Q. 1: How do you take nails out of a nail gun?
A. Power off the device, slide out the pusher of the magazine, and check for any existing nail. After that, dislodge the nail with your fingertip or nail, or with a pair of pliers. Then simply take it out of the barrel or magazine.
Q. 2: How do you remove a stuck nail?
A. Nothing is more irritating than getting your nails stuck in your nail-gun while you are in full operation. If a nail of yours gets stuck, you can draw it out using another nail or pull it out using a pair of pliers. Continue dragging the nail out with continuous effort as long as it gets out. Some extra time may be required to do this.
Q. 3: How do you remove finish nails from the back of trims?
A. You may need to remove finish nails from the back of trims when you make a change in design but continue with the same wood. So, the wood must remain unhampered. This is the reason hammering is not a good option at all. Nippers and slip-joint pliers are better to pull out nails from the back.


