The drill press comes in different styles and functions specifically designed for wood, metal or plastic. Though the types would vary in the area of fine points, the steps for proper maintenance are similar. A maintenance routine must be developed and sustained to keep it working at its highest performance standards. Neglecting to care for the machine could lead to rust-induced damages. Faults can also develop from continuous use of a worn-out and wobbly quill which will affect the chuck of the machine.
Adequate safety measures and organized maintenance procedures when using the drilling machine can help avoid various problems. Below are step by step descriptions of what a thorough drill press maintenance checklist should be.
Drill Press Maintenance 101
The machine has different parts with specialised functions. These together cohere to give results. Here is a summary of the parts and characteristics of drill press
- The spindle – this ensuresn tight grip of the drill or cutting tools as it revolved in a particular position. It is usually vertical while the feed is laid out horizontally taking shape of the work table.
- The quill/sleeve assembly – it is usually laid parallel to its axis. Pressure exerted on the sleeve manually or automatically makes it to be cut as it revolves.
- The chuck – this comes in both keyed and keyless variants with 3 movable jaws at the edge of the spindle of the motor. It also holds the screw tips drill bits and at the right place.
- The head – this made up of the electric motor, the sleeve, the spindle as well as the feed mechanism. It is fitted to the column with bolts.
- The worktable – this has its support on an arm placed on top of the column. It can be tinkered with in order to accommodate varying heights of feed. It can also be tilted for end-drilling or angle-drilling.
- The base – It supports the machine as a whole. It must be fixed to the floor with bolts in order to aid vibration-free activities when in use as well as work accuracy. Its top is just like the worktable and sometimes equipped with T-slots for raising large chunks of work.
Basic Care of Drilling Machines
In addition to drilling precise holes, both woodworking drill presses and magnetic drill presses help you perform a variety of functions such as countersinking, boring, reaming amongst others. So, there are basic maintenance measures involved.
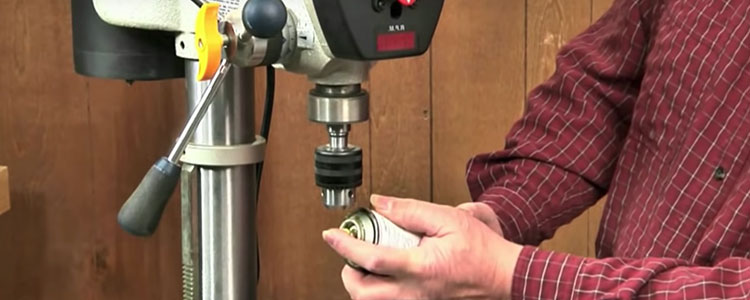
- Lubrication – because of heat and friction generated when machine parts move, lubrication is a routine requirement. The manufacturer’s manual must be followed for proper methods.
- Special Care – whenever machines are operated in extreme conditions or severe weather, special care is in order. Extreme heat may cause the motor to over heat. Extreme cold may cause the metal to become brittle.
1. Handle the Lubrication Carefully
Lubrication is very necessary and should be done as frequently as required based on use and the make of the drill machine
- The right kind of oil must be used to avoid compromising machine quality in the long run.
- Ensure you are using the right lubrication methods as listed on the manufacturer’s manual
- Make sure that the machine is cleaned thoroughly after each use
- The ball bearings are greased by default, you don’t require to lubricate them any further.
- Apply oil to the rack, gear, elevation mechanism of the table and the splines.
- Make sure to remove chips in order to avoid damage to and hazards from the machine’s moving parts.
- Apply light coat of oil on all non-painted surfaces so as to prevent rust.
- Do not overwork the electric motor. Make sure to operate with care and precision.
2. Inspect and Tune up the Drive Belt
If the belt is worn or chipped, a lot of noise and vibration results. Inspect the drive belt by following these steps
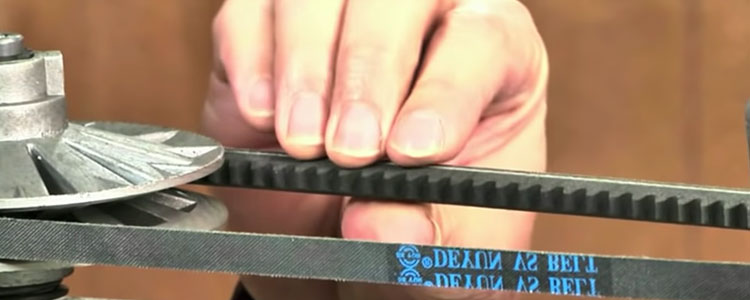
- Unplug it
- Scrutinise the belt visually
- Replace immediately if any defects are noticed
- If there are no defects, check that the tension is right.
- Reset the tension if it is too tight or too loose.
- Strictly follow the manufacturer’s manual guidelines.
Inspect the Belt Condition and Tension
In the case that the belt is slightly deflecting, inspect the belt by pressing the central point in between the drill pulleys. You can do it all yourself by complying with the user’s manual, and take help of a more experienced person if needed.
Test the Belt
This is the component tried for speed adjustment. A good hand inspection should alert you to any imbalance in the drive belt. Usually, vibration or impreciseness are indications of a faulty belt. Unplug the machine, and open the lid that contains the pulleys. Here, you may find black dust: rubber particles that used to be part of the drive belt.
To check for excess wear in the thickness and width of each belt, remove the belts and slowly run them between your thumb and forefinger. If you notice any irregularities get good quality replacement belts. You should also consider replacing your standard V-belts with link belts.
3. Inspect and Tune up the Quill
Axial play and radial play are two kinds of malfunctioning that affect the quill. It is a major cause of frustration when the work refuses to respond to the machine’s efforts and the workman. You can easily fix the quill play with proper instruction. Once the quill is observed to show some kind of play, do these things:

- Detach the quill to inspect it thoroughly. Ensure that you are removing all parts that are involved with the cutting process.
- Produce two holes amidst the housing and add an adjustment bolt to keep the pressure moderately on the drill bore.
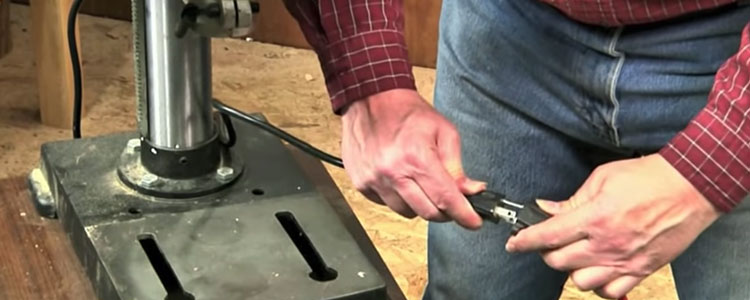
4. Inspect the Switches and Power Cord
This is a point that must not be neglected especially when trying to diagnose malfunction. Follow the steps:
You should use the multimeter to check the switches and power cord. If there is no sound produced by the multimeter when you connect the switches, you surely have a defective wire. If it produces beep sound twice, that refers to the shortage of power cord. If it beeps once, the connections are absolutely okay, and you don’t have to think about the diagnosis process anymore.
- Repeat the process with the second prong
- Remove the field wires
- Test the tool for maintaining switch continuity
Now you can test the switch for continuity. Touch one of the probes to one of the incoming power connections on the switch. Now touch the other probe to one of the field wire terminals. Then, test the second field wire terminal. Repeat on second switch terminal.
If you have continuity through the cord and switch, you will want to check the tool. Touch the multimeter probes to your tool or appliance’s field wires. If the multimeter beeps, then you have continuity. If the tool has continuity then you probably have a more complicated electrical problem that will require a more advanced diagnosis.
5. Clean the Table
Ensure that the workspace is neatly kept with the strictest safety procedures. This will help avoid the likelihood of accidents on persons and accidental damages of tools and feeds.
Professional protective sprays and degreasers can be purchased from your local tools shop. Using such agents can improve the safety of your work environment while keeping it germ-free.
Additional Tips to Follow
- Work in a safe environment.
- DO NOT expose any electrical tools to a wet and damp environment.
- DO NOT use electrical tools in the presence of flammable substances.
- ALWAYS keep the work area clean, well lit, and organized. DO NOT work in an environment with floor surfaces that are slippery from debris, grease, and wax.
- Keep visitors and children away. DO NOT permit people to be in the immediate work area, especially when the electrical tool is operating.
- DO NOT FORCE THE TOOL to perform an operation for which it was not designed. It will do a safer and higher quality job by only performing operations for which the tool was intended.
- Remember to wear appropriate cloths and take other protective measures to avoid any sort of health injuries.
- CHILDPROOF THE WORKSHOP AREA by removing switch keys, unplugging tools from the electrical receptacles, and using padlocks.
Drill press mac is the equipment of choice when accuracy, precision and smoothness are aimed for in wood or metal work. The above preventive maintenance checklist and other care and procedures will help ensure that the user the drill avoids some common hiccups and increase the machine’s lifespan.
It is always best to follow a machine according to the specifications of its make. While following general safety and precaution guidelines is advised, a careful look at the manufacturer’s manual is always in order.
FAQs:
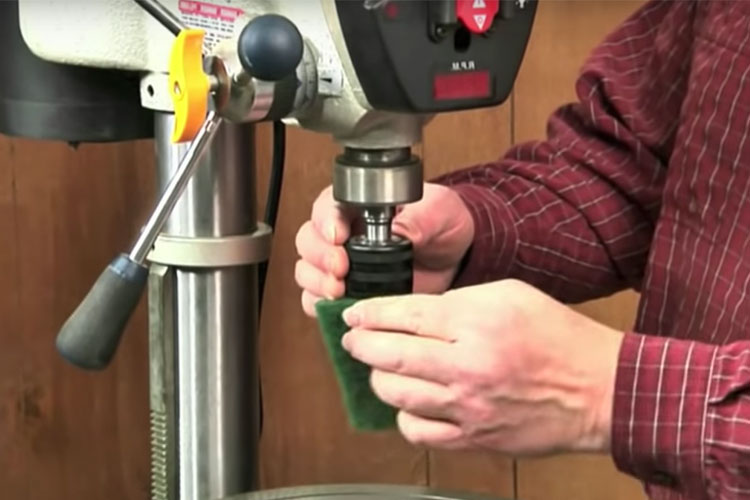
1. Does paste wax prevent rust?
Ans. Apply WD-40 and clean the column with a paper towel and coarsest scrub. You can also apply the penetrating oil with a maroon pad.
2. What causes drill runout?
Ans. Runout happens when a drill press doesn’t rotate precisely in line with its main axis. The drill rotates off-axis, so you may get a bigger hole than the nominal diameter of the drill.


