
A drill press is a must-have for every serious woodworker who looks forward to enjoying increased productivity with the machine at work. Not only are drill presses a good working tool, but they are also basically what gives a woodworker an edge over other craftsmen. As a woodworking tool, the drill press can be used for a number of works like cleaning holes more effectively without stress, boring long spindle holes, and other sanding activities.
The chuck of a drill press is a component that allows it to carry out any task. So for the drill press to work effectively, the chuck has to be in the best state. In this discussion, among other things, we shall be looking at how to remove chuck from drill press easily.
Why Does a Drill Press Chuck Need to Be Replaced?
A drill press chuck is a part of any standard and properly built drill press that makes it easy for the drill press to drill more efficient holes than other drilling devices. Due to the nature of the drill press, especially when used for a long period of time, it is most likely to get damaged or worn out.
A drill press chuck needs to be replaced on a timely basis for a number of reasons. These reasons among many others include.
- Due to prolonged uses, it becomes susceptible to damage. A drill press that is used for more rigorous drilling task or used over a long period of time is most likely to have its damaged. A damaged drill press chuck needs to be replaced, as a part of the setup process or an effort to keep the drill press working.
- A worn out drill chuck also calls for a replacement, It is possible that the drill chuck might not be damaged, but still needs to be replaced. A drill press used regularly is likely to get worn out. A worn out chuck will affect the working of the drill press as a whole making a drill press chuck replacement very important.
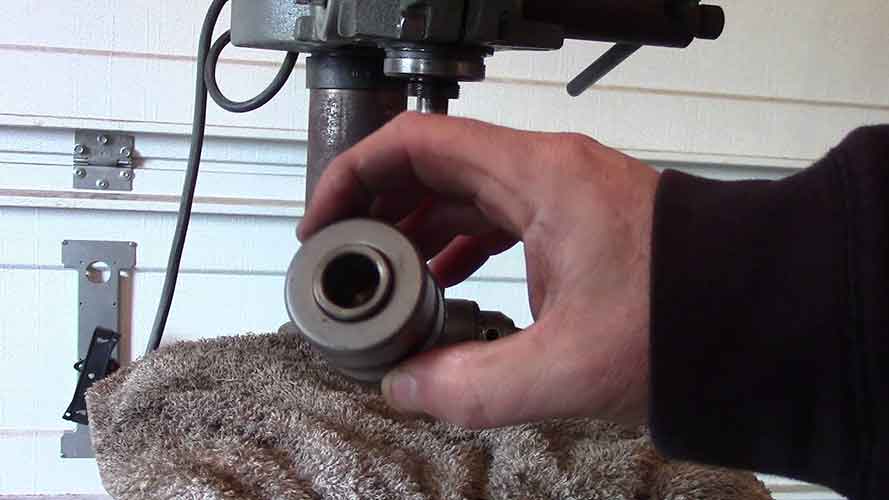
How to Remove Chuck from Drill Press?
Having already discussed what a drill press chuck is and what drill press chuck removal is about, let us see how to remove a drill press chuck.
Removing a chuck from a drill press is something that can be done by anyone. You do not require the services of any professional whatsoever to know how to remove drill press chuck. To do it by yourself and do it effectively, just follow these basic steps.
1. Understand Your Drill Press Chuck Requirement
Drill press chucks differ from one other in terms of design and how they are structured. The way drill press chucks are to be removed varies from the keyed chucks to the keyless chucks. This is why understanding the type of drill press chuck to be removed and the requirement is very important.
2. Pull down the Handle of the Chuck
With the drill press chuck type known, you can now go on to begin pulling down the quill and chuck. When doing this, make sure you pull it down to as low as the chuck can go. After that, turn the knob of the quill to keep the mechanism in a more lowered position.
3. Locate the Large Vertical Slot
The large vertical slot is usually located within the shaft of the quill in most drill presses. When the vertical slot is located in the drill press, all you need to do is to tap the end of a removal key attached to it. As soon as this removal key is tapped, the chuck will bounce out the spindle.
4. In the Absence of Removal Key, Raise the Quill
If you have a drill press chuck that doesn’t have a removal key or corresponding vertical slot, you can raise the quill, and at the same time, you may do some quill fixes if required. When raising the quill, make sure it is raised to a height of about 1/2 inch below the drilling house and secured with a lock. When secured, go on to place an open-end wrench into the quill spindle right above the chuck collar. Gradually push up the wrench till the chuck falls out of the quill spindle.
5. Make Sure to Wipe the Chuck with a Dry Cloth
After the chuck must have been removed successfully, use a microfiber cloth to clear the shafts. End by making use of a blower to blow the bottom of the quill spindle free from any dust, grime or debris.
6. How to Replace the Chuck?
After you might have successfully removed the chuck from the drill press, the next thing to do is to replace the chuck. Replacing the chuck of a drill press release is as simple as removing it. To replace the chuck appropriately, follow these steps.
- Raise the Quill and Tighten Up. In replacing Chuck, you have to ensure that the quill is raised to its limit and tightened to ensure that it is secured.
When secured, turn the drill table to take it away in other to prevent it from interfering with the replacement process.
- Go On To Put The Chuck Shank. When the quill has been heightened and secured, and the table was taken away, you can now slide the chuck shank in the quill spindle.
To do this, you will have to turn the chuck a bit till its square head aligns and fits in well into the quill spindle. When it is properly aligned, remove the jaws and hit the bottom of the chuck till the shank of the chuck fits firmly into the quill spindle.
- Make Sure To Check the Chuck’s Operation. When the chuck has been put in the right place of the quill spindle, rotate its collar to secure its operation. Then power the motor and put it to test to bed sure the newly replaced chuck is well fixed and working properly.
Is a Removal and Replacement the Only Way to Go?
The nature of the drill press chuck determines whether a drill press chuck removal and replacement are what is needed, or if cleaning the chuck will be a better option.
For a drill press chuck that is not totally damaged, maybe just not working well due to excess specks of dust and debris in it, cleaning it would be sufficient enough to get it working again. A regular check on the drill press chuck is the only way to detect this.
On the contrary, cleaning a damaged drill press chuck will not do the drill press any good. In a situation where the drill press chuck is totally damaged, the best option can a drill press chuck replacement and any standard and properly built drill press to keep the drill press working effectively and at a high performance.
How to Clean the Chuck?
As much as it is important to know how to remove the chuck from the drill press and replacing it, it is also necessary to know how to clean it. The process runs through a three-way channel which includes first, the removal process, the cleaning process and then the replacement process. To effectively clean the chuck, follow these steps.
- Disconnect totally from the power cable. Avoid working on the chuck of the drill press while still connected to a power cable.
- Go on to remove bits and specks of dirt from the chuck whilst rotating the collar till jaws are extended.
- Use dry clothes, free of lint to clean the chuck.
- Remove all the jaws and make use of a blower to take away dust, grime, and debris.
- Clean both the inside and outside surfaces of the chucks blowing air with a nozzle where needed.
- You can make use of drying lubricant spray to achieve more effective results, especially into the open jaws.
- Lubricate all the parts and do this rotating the collar so that every part that needs to be lubricated is lightly lubricated.
Remember the Safety Matters
While removing, cleaning and replacing chucks, it is very important that you ensure your safety. To ensure your safety, you have to stick to and obey a number of safety precautions. Safety precautions for removing drill press chuck includes:
1. Wear Protective Glasses
Since the majority of what is to be taken out of the chuck are dust, dirt and grimes, you need to have protective glasses on. This is very much important when you are making use of the air nozzle. With protective glasses on, you will be able to shield your eyes from particles going into them.
2. Avoid Lubricant Spray from Coming in Contact with Your Body
When making use of lubricant spray, make sure to have your hands covered with gloves and your body protected. A number of these sprays contain chemicals that can harm your body.
3. Keep the Quill Spindle Tightened
At several points through the removal and replacement process, is the need to keep the quill knobs tightened. Make sure to stick to this so you don’t make a mess of the removal process causing you to start again or lose touch of the entire process.
Knowing how to remove the chuck from drill press is good, but knowing how to remove, clean and replace is best. This way, you will not need to sort the help of any professional to effect either cleaning or replacement. With a good knowledge of all the three processes, you will be able to save some cost while keeping your drill press chuck in the best working condition.


