A wood jointer is one of the many machines a woodworker is most likely to have come across while working on a number of projects. As simple looking as a wood jointer is, it is very helpful to both beginners and professionals of woodworking. More serious projects require more effective machines one of which is the wood jointer. This is why in this discussion of how does a wood jointer work, we shall be looking at the totality of the function of wood jointer.
While this discussion will be very helpful to woodworkers, it is not limited to them. You can also make use of this piece to increase your knowledge about the functionality and components of wood jointer. It can also be as a work through guide to complement the user manual that comes with every wood jointer machine.
What’s a Jointer?
The jointer is the third to table saw and thickness planer that all make up the Trinity of stock dressing. However, of these three stock dressing machines, the jointer is the least understood in terms of functions among woodworkers. As a woodworking tool, a jointer is very simple to use which includes straightening and flattening a stock. The reason why a number of woodworkers misunderstand this machine is probably because of how frustrating it can be. However, if properly set up and maximized, it is known to be one of many effective and precise woodworking machines around.
The question here is, how does a wood jointer work to straighten and flatten the stock? It is very simple, and we shall soon be running through the process in which this machine follows to function effectively.
How Does a Wood Jointer Work?
As a woodworker or furniture maker, you cannot know how a wood jointer works without being familiar with the components. So to effectively maximize the jointer as a woodworking machine, getting familiar with its components is necessary. This enhances your overall understanding of the machine and aids your use of it.
So, How Does a Wood Jointer Work?
A jointer comes with a rotating cutter head, about two or three fine and sharp blades located in between two leveled and small tables. The number of blades a jointer comes with depends on the size of the jointer. To straighten or flatten the stock, it is pushed over the first table which is known as an infeed. Then it is also pushed past the cutting head of the jointer to the second table which is called the outfeed.
While the infeed table has an adjustable height depending on the amount of material to be removed from the cutter, the outfeed doesn’t. The outfeed instead has the same height with the cutting head of the jointer. The board is then passed through the fence to square it up or bevel its edges. To do this, the fence has to be set in a way that it is perpendicular to the tables and the cutter as well. The fence of a jointer is also adjustable and can be tilted while in use.
Knowing About the Components Parts
The jointer is not a complex machine, and as such its part is very simple. As simple as they are, so are their functions. The most functional parts among many others of the jointer include the infeed table, the outfeed table, the cutter head, the fence and the guard. One must receive safety training to use this tool with no risk. Let us examine these parts briefly and see what they do.
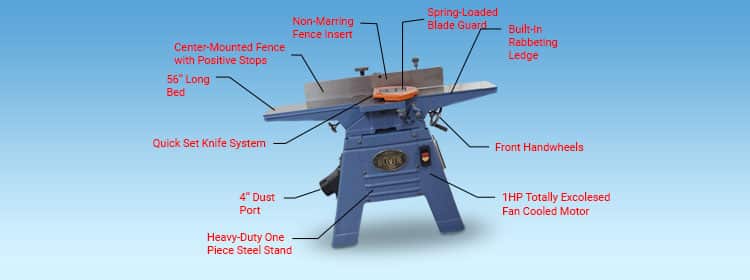
- Infeed Table: This is the first of two tables which the jointer possesses. The infeed table is the one that first receives the stock or the board. As the board is placed on it, it is gradually pushed through it. This table doesn’t have a fixed height; its height can be adjusted to suit the amount of material that is to be shaved of the cutter.
- Outfeed Table: The outfeed table is the second table the jointer machine possesses. It comes with a very thick layer and is about the same height as the cutter head. It is the table that presents the outcome of a straightened or flattened stock. This is after it must have passed through the infeed and the cutter head.
- Cutter Head: The cutterhead of a jointer is what is being used to clear of any extensions that contour the wood. Since the idea of a wood jointer is to straighten the wood, the cutter head is what helps to shove off materials not needed away from the piece. When this is done, the wood piece is pushes through to the outfeed table.
- Fence: The fence of a jointer is adjustable and can be tilted while straightening or flattening the wood. It is also used to square up the wood and bevel up its edges. A perpendicular placement of the fence with the table and cutter is always the best way to position it.
- Guard: The guard of the jointer is that part of the machine on both sides that helps to ensure the wood piece being jointed is firm and in place. This is helpful to prevent the board from going off or not standing well on the jointer has it moves through the machine.
How Does the Whole Thing Function to Deliver a Result?
Having seen what a wood jointer its and the various components that it possesses, let us quickly see how it functions to deliver a result. To do this, we shall be running through a number of techniques to be followed to make use of the jointer.
- Keep downhill jointed. When making use of the jointer for edges, you have to always joint downhill to avoid the stick from tearing pout. Once the feeding stock is away from the rotation of the knife, you are sure to have more precise results. Avoid joining end grains because it can be shattered easily.
- Always make sure the outfeed is properly aligned. The dangers of the outfeed not being properly aligned are numerous. It is dangerous for the work at hand and to you as the woodworker. The outfeed shouldn’t be too high or too low to avoid concave surfaces or heavy cuts.
- Start first by jointing surfaces using a jointer. When you start out wood jointing by jointing the surface first, you are able to get a jointed edge square to the board’s face. When this is down, place the jointed surface against the fence allowing the grain to run downhill joint and square other edges. This way you are able to achieve a flat surface and good ripping edge.
- Join the wood edges perfectly. This is done to avoid minute gaps out of square fence causes. To do this, you will need the good surface of the board to be joined. Joint a board with the good surface of the other without the fence, then joint the good surface of another board against the fence. This will fit in well after which you are required to seal it up with glue.
- Finish up by flattening the cup. When doing this, you are to start with concave side. Face joint this side by putting it through the planer to remix the convex side. Make you of a pushblock to do this better and faster.
How Does a Woodworking Jointer Work in Different Situations?
A standard woodworking jointer serves different purposes at different times to different woodworkers. Your understanding of the function of a wood jointer as a woodworker is what determines your use of it. This is probably why professionals and beginners have different understanding of the uses of basic woodworking tools. This is what makes knowing the purpose for which you need a wood jointer before going all out to get one.
When you know what work is to be done and you are sure that a wood jointer can help you carry out the task, you are already half way good to go. Let us look at a number of ways a woodworking jointer can serve.
1. To Straighten a Bowed Board
Straightening a bowed board is one of that many function of a wood jointer. A jointer helps to achieve a well flattened and straightened board with relative ease provided you know how to go about it. To do this, you have to change the working technique a bit. Unlike what is generally achievable with a jointer, here, you have to joint an edge where the bow is facing upward and not laying on the table. This makes straightening the bow a whole lot easier for you to do.
Alternatively, if you will still have to joint edge with the bow facing downwards, a lot of pressure needs to be amounted. Here, maximum focus is needed on the infeed table as the board passes it through it with much pressure to the cutter head of the jointer. The more pressure is placed on the infeed table, the more you are likely not to repeat the process for a long while. You will need to continue passing the board through to the infeed table across the cutter head till it is straightened.
2. To Square up a Second Edge
Sometimes, when you are done straightening the piece of stock, a need might arise to square up more edges. With a woodworking jointer, this is absolutely possible. All you need to do is square up the second edge in a perpendicular direction to the first edge that was joined. Before you do this, make sure you check the fence and be sure that it is in place and squared up to both the infeed and the outfeed tables. You can also make sure the fence of the jointer is at a 90 degree considering that it causes be beveled.
At 90 degrees to the table, it is very easy for you to make use of the fence to square more edges. It happens just like the initial edge jointing with just a little more pressure added consistently to the fence. To repeat for another edge, go on to keep the second jointed edge against the fence again and move the stock through from the infeed table to the cutter. Be careful about your hands because the blade is sharp and you need to maintain your safety. Keep passing the board through the infeed over the cutter until you achieve a perfect edge that is flattened and squared up against the fence.
3. Beveling the Fence up to 45 Degrees
This is a side experiment you can try while you are less busy in your woodworking shop making use of a jointer. All you need to do here is to see if you can bevel your jointer’s fence up to 45 degrees. If you are able to do this, you will be able to use the jointer for other tasks like jointing mitered joint butts. You will also be able to mark certain points on the angled fence among other things.
It doesn’t matter as to you being a beginner or a professional woodworker, you have definitely asked at one point or the other ‘how does a wood jointer work?’ Yes, this discussion has just provided you with the basics of how a wood jointer works. This is very important to know because it gives you an edge over other woodworkers especially when handling more serious tasks.
However, in making use of a wood jointer, it is very important you stick to a number of jointer safety precautions. These precautions help to keep you safe while making use of the jointer. They also help to ensure you work comfortable and effectively with the wood jointer. A number of this jointer safety precaution includes
- Make use of safety glasses, hand gloves and necessary ear protection.
- Secure all of the locks and screws of the jointer before making use of it.
- Put off the jointer before making any adjustments.
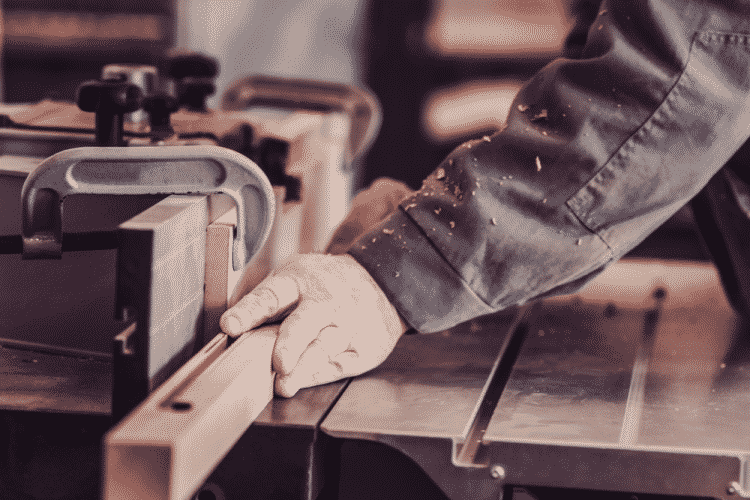
- Make use of pushblocks and keep fingers out of harm’s way especially when working on narrow pieces.
Make sure as you make use of the wood jointer, you don’t just follow the instructions that dictates it use. You should also make sure you adhere to these jointer safety precautions. These precautions are as important as knowing how to make use of a wood jointer.


