As a woodworker, you know How To Build a Drill Press Table. Unfortunately, it comes with a cast iron drill press table that is durable, yes, but too short for woodworking. Some are bench-top table models without a zero clearance feature or even a fence. If you are too unlucky to have one of these built-in drill press tables, don’t worry.
With less than fifty dollars and a few hours of DIY work, you can make a drill press table that helps you on any carpentry job. A drill press table is easy to make if you are a woodworker. If you are not that, don’t worry. All you need are detailed instructions just like the ones on this page.
How To Build a Drill Press Table (Full Guide)
Why Would You Want to Make a Table?
The reason why you find it hard and time-consuming to set up your best drill press is that you still need a solid table. So, a homemade drill press table is all you need. It will make the use of the drill press so much easier and quicker. Once you make it, these benefits will follow
- Easy drill press set-up
- Better stability when using your drill press
- Increased drill accuracy
- Ability to bore holes repeatedly
- Increased safety when using your drill press.
If you organize your project well, you will utilize minimal hardware to build a drill press table that will be easy to mount and dismount.
Understanding the Different Parts of a Drill Press Table
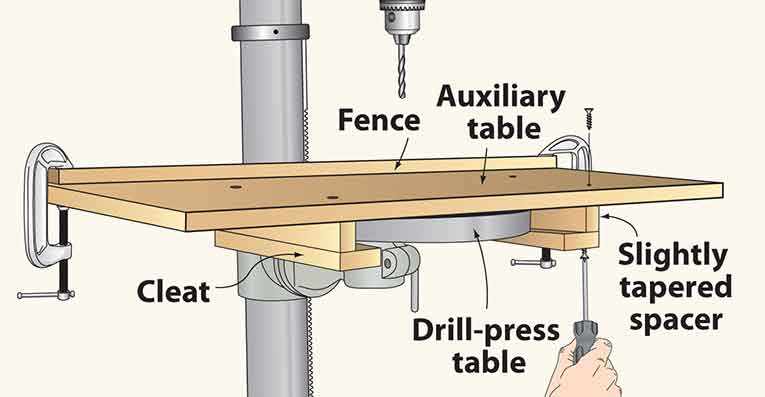
Are you prepared to make your first DIY drill press table at home? If so, your table will have a simplistic design; it will have these sections:
1. The Table Top
This is a crucial component of your drill press table. It will consist of two layers to increase its durability. The upper layer will be made of a cheaper and replaceable material like plywood. This double layer also makes a rigid and strong table that can take a lot of abuse.
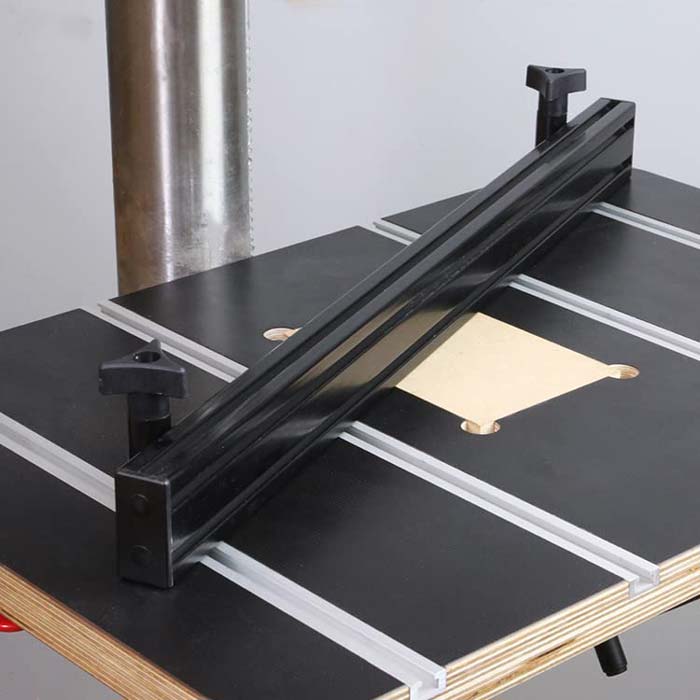
2. The Fence
Usually an adjustable hardwood fence, this component is an integral part of a great drill press table. It should slide along T-grooves to the left and right and back and forth.
3. T-Tracks
These are vital parts that will not only hold the jigs, hold-downs, and fence in place but also facilitate adjustments.
4. Built-In Stops
These are movable blocks of wood that will help you do repetitive work like chain drilling and doweling.
5. Hold-Down Clamps
These can be purchased online, and their work is to hold down small pieces of work that you cannot hold steady with your other hand when drilling.
6. Understanding Zero Clearance
Zero clearance is when the piece of the project you are working on is fully supported around the drill bit where it exits the wood. On a drill press table, zero clearance prevents unsightly holes from being created by the drill bit.
If the drill bit pushes through the back of the hole and traps wood fibers, it can leave behind an ugly hole. But, if the workpiece is placed on a fragment of wood when drilling out the back of the hole, the bit will not bring wood fibers along with it.
7. Fence
A fence that the drill press chunk will not keep on bumping into when running is essential. So make a clearance hole for the chunk. This will help you bore holes so close to the fence without problems.
8. Throat Plate
To increase the life of your tabletop, make use of a replaceable throat plate. It will take the abuse on the top’s behalf.
9. T-Tracks
These are necessary when you wish to create a sliding fence and to install hold-downs.
10. Laminate
This should be placed on both the bottom and top sides of your drill press table. They will prevent the top from warping when humidity is high.
11. Edging
This is a hardwood banding installed for two reasons: aesthetics and protecting the sensitive edge.
How to Make a DIY Drill Press Table?
When it comes to how to build a drill press table, there are some steps you should follow. These include the following:
Step 1: Get Your Materials Ready
This project uses a Baltic beach panel. A whole sheet is not necessary. So purchase a 24” x 48” panel.
Step 2: Cut Your Panel into Pieces
To begin the process of building a DIY drill press table, cut your large wood panel with your circular saw. Then use your miter saw, and table saw to make tinier cuts. Your finished table dimensions should be 12” by 24” plus a 2” tall fence. From a ¾” Baltic birch plywood, cut the following pieces
- 1 table base – 12 by 24 inches
- 2 top end pieces – 12 by 3-5/8 inches
- 2 Top midway pieces – 12 by 4 inches
- 1 top center piece – 12 by 7-1/2 inches
- Four stop blocks – 2 by 2 inches
- Two toggle under mount – 2 by 8 inches
- Two fence – 2 by 24 inches.
From a ¼ Baltic birch panel, cut 1, two by 24 fence piece.
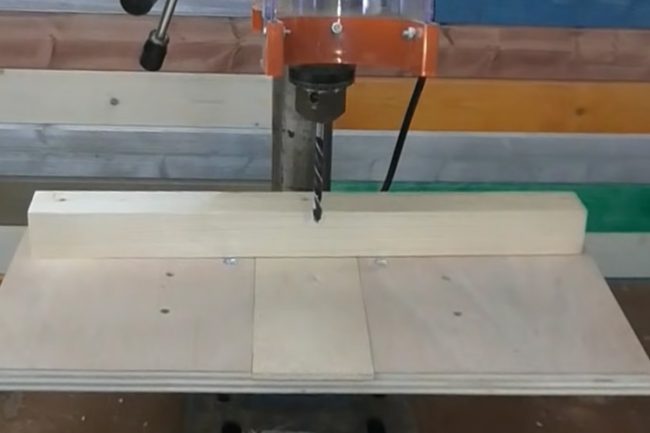
Step 3: Build the Table Top
To simplify this step, buy factory-made T-tracks and T-slot bolts. If you wish to reduce the cost, however, you can improvise your rabbets. With your handheld router and straight bit, design your rabbets—1/4-inch wide X 1/8-inch deep.
Cut down your top centerpiece to make a removable insert. First, cut the piece at 2-5/8″ beginning from one side. Repeat the same cut on the other end to be left with a 2-inch insert.
Next, make some spacers. Cut a 3/8 inch strip on your table saw and then use your crosscut sled to trim it down into small 2” pieces.
Finally, glue your pieces together. So, apply glue to the backs of the top pieces without smearing your rabbets.
Add your spacers as you glue the pieces from left to right. The 2-inch spacer in the middle should not be glued though, as it should be removable. Leave the glue to dry.
Step 4: Build the Fence
Getting a fence is important for proper drilling of holes. So, the next thing on how to build a drill press is to make a fence. This is how to do this:
Glue and fix together your two fence pieces and leave them to dry.
Next, create a 3/4inch by 3/8inch deep dado down the center. Ensure that you attain consistent depth along the whole cut.
Now fix the ¼” plywood on top with glue while avoiding the dado. Clamp it so it can dry.
With your table saw, make a shallow groove (about 3/8” wide) by cutting through the ¼” plywood. This will let you slide your toilet bolt in the track.
Buy the longest toilet bolts you can find to simplify this part.
Step 5: Mount Your Table
Here you need to be careful as you want an easy and quick way to attach and detach your DIY drill press table. While most woodworkers use bolts to mount their table to the drill press, this isn’t practical when it comes to quick removal.
So it would be better to use toggle clamps for mounting. A pack of 4 will only cost fifteen dollars or less, which is inexpensive.
Place the table at the center and ensure that it aligns well with your drill press. Mark the bottom on either side of your table and screw on a scrap of plywood on each side too.
Mount your toggle clamps to the plywood pieces and you are done.
Step 6: Cut Stop Blocks and Attach Hold down Clamps
Cut additional 2” x 12” inserts for future use when yours get damaged. Moreover, cut 2” by 2” stop blocks and use your 3/8 drill bit to bore a hole in their cores.
Mount your blocks to the fence to help you create repeated holes in the same spot. Alternatively, fix them to the T-tracks in the table to help hold down your project pieces.
As for hold down clamps, these should be bought online. They are inexpensive T-slots that will be useful each time you want to drill into tiny pieces that you cannot hold down with your other hand.
Gathering the Supplies/Tools
When you decide to build a drill press table for your woodshop, ensure that you have the following tools and materials. See the lists below:
i) Tools
- Drill press
- Miter saw
- Table saw
- Circular saw
- Forstner bit
- 3/8 drill bit
- Palm router
- Clamps
- Straight router bit
- Glue brush
- Titebond II glue
ii) Materials
- Hold down clamps
- Toggle Clamps
- Star knobs
- ¾ and ¼ Baltic birch plywood panels
- 1-1/4” flat head screws and ¾” pan head screws
- Toilet bolts
- T-tracks
Cutting Top Parts and Inserts
The table top part will look similar to a workbench top. And for the bottom, you will only need ¾” of plywood. Once you have cut all the pieces for the table top perfectly, make three replaceable inserts too. These should be 5” by 5” and pieces that can be turned, slid or flipped to make full use of them.
Making the Center T-Track
Before gluing your ½ inch pieces, ensure that you cut a notch in one of your pieces. This is where a short piece of T-track that will be used with a hold-down clamp will be inserted. Once you cut the required length of the T-track with a hacksaw, use a band saw to cut a notch.
Understanding T-Track Variations
If you wish to buy your T-track, there is one fact about them that you should know. These come from various brands and vary widely in terms of height and holes spacing. So it will be necessary to select a T-track that will go well with the size of your plywood. As for the holes spacing, some T-tracks’ holes appear every 3 inches and others every 6 inches.
Attaching the Top Parts
The best way to connect the top components is to use the T-track and inserts or spacers if you have them. Align all pieces and apply glue from end to end. Then, remove your T-track and inserts, place some weights to the top and wait for the glue to dry out.
Making the Corners Round
To do this correctly, you can use a quart container to form a curve on the front two corners. Next, use your jigsaw to slice the corners off. Sand them down carefully without altering the square-shaped top surface.
Setting up the T-Molding
Installation of the 1-1/4” T-molding shouldn’t be difficult at all. Start at the back left corner and work your way around the top with a small amount of wood glue. Then, cut three or four tiny notches in the tongue of the T-molding to make it bend easily around the corners.
Use tiny bands of painters’ tape as your clamps while waiting for the glue to dry. Clamp one of your inserts in place and then use tape to tighten the molding against it. This will tighten the molding along the center. Cut excess molding with your knife.
Using Boiled Linseed Oil
Apply a layer of boiled linseed oil to the whole drill press table. Start from the top to the bottom. The new coat may not last long, but it will make your finished table prettier.
Attaching the Back, Left Cleats of the Table
To do this, cut two half-inch thick cleats out of your plywood. Then, apply glue on one side of the cleats and screw them along the back of the underside of your table. Position the table in the middle so that it aligns well with the drill press. Mark the location of the left cleat, glue and screw it on too.
Attaching the Front, Right Cleats of the Table
Cut 1-1/4” tall cleats out of your plywood and drill a hole for a T-nut in the middle of each of these. On the underside of your table, mark the location of each right cleat, drill holes on the table bottom, and attach cleats with flat head screws.
Cutting the Fence Parts
To cut your fence parts, use a miter saw and then the table saw. You need 2, ½” panels and 1, ¾” piece of fence. To ensure that your drill press chuck won’t bump into the fence, cut a groove in the top middle of your front fence pieces on the band saw.
Assembling and Attaching the Fence
To construct your fence, use one ½” piece for the bottom and the smaller ¾” piece on the top of that that will hold the T-track piece. The other piece of ½” would then be attached to the front using glue to come up with a smooth surface. Attaching the fence pieces involves only gluing and clamping. T-track pieces for the fence need to be predrilled and screwed into place. Listen, my friend! You’re not on the eve of your drill press table setup, but you’re very close to that. So, stick to the next steps.
Using Polyurethane Finish
Polyurethane layers should be applied to the table before installing your last T-track. Do light sanding amid your coats too.
Setting up the T-Track
Use a small amount of super glue first. Then tape your last T-track into position, pre-drill and screw it down.
Creating a Stop Block
To make a stop block, use the tiny scraps of wood that will be left at this stage of your project. Ensure that your stops are movable to build your fence flexibly. Screw your ¾” and ½” piece together in an L shape. Drill a hole for an extra bolt and start knob. Finish the task.
Making Arrangements for Dust Collection, Hold Downs, and Repetitive Drilling
To help make repetitive holes down the end of your workpiece, mark a vertical line in the middle of the fence. Buy some hold down clamps to utilize in the T-track as these will be useful when drilling small workpieces. As for dust collection, make a separate and dedicated hold down clamp that can hold your shop’s vacuum hose in place.
Giving the Finishing Touch
Now, you need to add some finishing touch to your table. You may not feel very proud of the table’s design that you wanted to look like those of high-quality, sturdy ones, but it still is a good thing to go for.
Safety Tips
As we come to the end of this article, we would like to talk about safety measures when building a drill press table. You shouldn’t hurt yourself in the process. So make sure that you use the most dangerous tool, the drill press, cautiously. As well, take care of your fingers when cutting wood with different saws.
To conclude this article on ways to make a drill press table at home, we would like to encourage you to try it out. It isn’t a complicated procedure at all, and it is also inexpensive and fun to do.
Once you are done, you will have a bigger and stable surface which will make securing your workpieces easier. Additionally, you will drill holes of the correct sizes and shapes again and again. Once you learn how to make a drill press table and create one, feel free to share a video or a picture with us.


